Now that we have the bot setup, we need to add some commands. Let’s start with a simple slot command. This command will send 3 emojis in a random order, the point is to have the diamond first. PUT IT UNDER THE READY COMMAND
client.on('message', message => {
  if (message.content.startsWith('ms!slot')) {
    message.react('⭕');
    message.react('❌');
    message.react('?');
  }
});
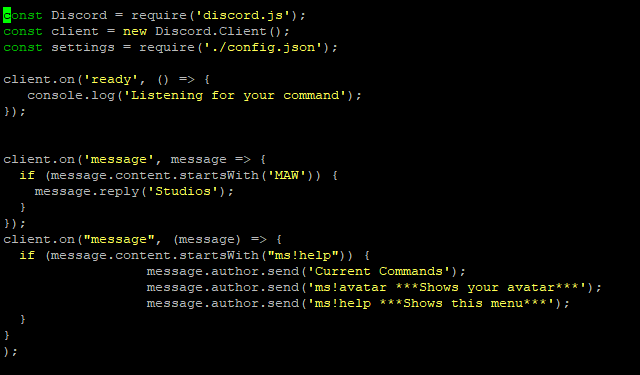
Now that we have that done, let’s create a simple help menu. First we need to create the 1st part, so start by putting this code below the avatar command. NOTE: IT WILL SEND IT TO YOU THROUGH DMS AS STATED MESSAGE.AUTHOR.SEND
client.on("message", (message) => {
  if (message.content.startsWith("ms!help")) {
                  message.author.send('Current Commands');
                  message.author.send('ms!avatar ***Shows 3 emojis in random order***');
                  message.author.send('ms!time ***Shows the time***');
                  message.author.send('ms!help ***Shows this menu***');
  }
}
);
Success! We now have our own help menu, but, we could use a little more.
Always remember to put the commands BELOW the ready command otherwise it won’t register. For future reference place functions and consts above the ready.
For the next one I will be creating a command that will tell you the time. For this one we will be using variables.
client.on("message", (message) => {
  if (message.content.startsWith("ms!time")) {
                  let date_ob = new Date();
                  let hours = date_ob.getHours();
                  let minutes = date_ob.getMinutes();
                  let seconds = date_ob.getSeconds();
message.reply('The time is: ' + hours + ':' + minutes + ':' + seconds);
  }
}
);
Alright, now let’s add a command to show our avatar. NOTE: At first I had errors when running the command so it may not work.
client.on("message", (message) => {
  if (message.content.startsWith("ms!avatar") {
                  message.reply(message.author.avatarURL);

  }
}
);
Once you type the command it should send something like this
Jade Red
Do you plan on creating another one of these tutorials?